Running SOAP UI tests from MsTest

13. maart 2015 13:37 by martijn in .net, mstest, soapui

Recently I have been working in a project in which the tester used a tool called Soap UI. SoapUI makes it easy to create xml based test for services. Being a big fan of Continuous Integration I thought it would be cool to include SoapUI in our CI build cycle. Here's what you need to do to make it working


1. Install Soap UI

You can get a free version here. Take notice of the location in which it installs. For me this was : "C:\Program Files (x86)\SmartBear\SoapUI-4.6.4". I put this in the app.config of my test project.

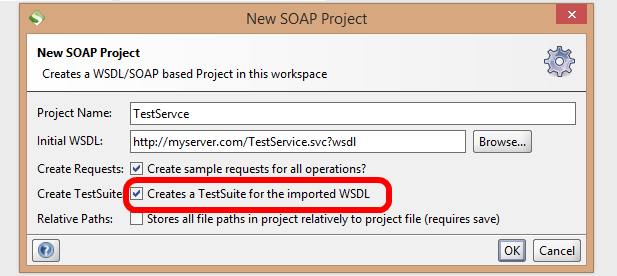
2. Create a SoapUI project. 

Start up your SoapUI and go File->New Project. Point it to the wsdl of the service you want to test and let it create a testsuite. 


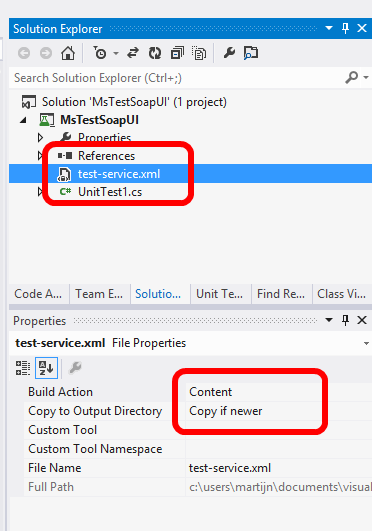
3. Add the Soap UI project to your MsTest project

In SoapUI right click save-project as on the project node. Save your xml file into a unit test project and include the xml in your project. Set Copy to Output Directory to "Copy if newer"


4. Running soap UI from MsTest

This is the tricky part. How can we get SoapUI to run our test from a UnitTest?? It turns out SoapUI has something called a Testrunner.bat which makes it relatively straightforward. Basically I create a testrunner proces in a unit test and redirect the output of SoapUI to the test output. Here's what the code looks like: (a zip of the project is included below). 

        /// <summary>

       /// Runs soapUI test named testName

        /// </summary>

        private void RunSoapUItest(string soapProject, string testSuiteName, string testName)

        {

            const string fileName = "cmd.exe";

            var soapProjectFileName = Path.GetFullPath(soapProject);

            var arguments = string.Format("/C testrunner.bat -s\"{0}\" -c\"{1}\" \"{2}\" ", testSuiteName, testName, soapProjectFileName);


            //for me this is C:\Program Files (x86)\SmartBear\SoapUI-4.6.4\bin

            var soapHome = System.Configuration.ConfigurationManager.AppSettings["SoapUIHome"];

            //start a process and hook up the in/output

            var proces = new Process

            {

                StartInfo = new ProcessStartInfo

                {

                    FileName = fileName,

                    Arguments = arguments,

                    WorkingDirectory = soapHome,

                    CreateNoWindow = true,

                    ErrorDialog = false,

                    RedirectStandardError = true,

                    RedirectStandardOutput = true,

                    UseShellExecute = false

                },

                EnableRaisingEvents = true

            };

            //pipe the output to console.writeline

            proces.OutputDataReceived += (sender, args) => Console.WriteLine(args.Data);


            //store the errors in a stringbuilder

            var errorBuilder = new StringBuilder();

            proces.ErrorDataReceived += (sender, args) =>

            {

                if (args != null && args.Data != null)

                {

                    errorBuilder.AppendLine(args.Data);

                }

            };

            proces.Start();

            proces.BeginOutputReadLine();

            proces.BeginErrorReadLine();


            proces.WaitForExit();//wait for SoapUI to finish


            //fail the test if anything fails

            var errorMessage = errorBuilder.ToString();

            if (!string.IsNullOrEmpty(errorMessage))

            {

                Assert.Fail("Test with name '{0}' failed. {1} {2}", testName, Environment.NewLine, errorMessage);

            }

        }

 5. Running a test per SoapUI testCase

A typical SoapUI project includes multiple testcases. To make each testcase run as a separate test we can use something called a DataSource attribute for the test. This attribute cause the test to run for every 'Row' in the XML.

[DataSource("Microsoft.VisualStudio.TestTools.DataSource.XML", "TestData\\test-service.xml", "testCase", DataAccessMethod.Random)]

Since every testCase is a row the makes every testCase run separately. You have to make sure you get xml deployed (I used a deploymentItem for that).


        /// <summary>

        /// Test Soap Stuff

        /// </summary>

        [TestMethod]

        [DeploymentItem(@"test-service.xml", "TestData")]

        [DataSource("Microsoft.VisualStudio.TestTools.DataSource.XML", "TestData\\test-service.xml", "testCase", DataAccessMethod.Random)]

        public void RunSoapServiceTest()

        {

            var testCaseName = TestContext.DataRow["name"].ToString();

            RunSoapUItest(@"TestData\test-service.xml", "BasicHttpBinding_ILicenseService TestSuite", testCaseName);

        }

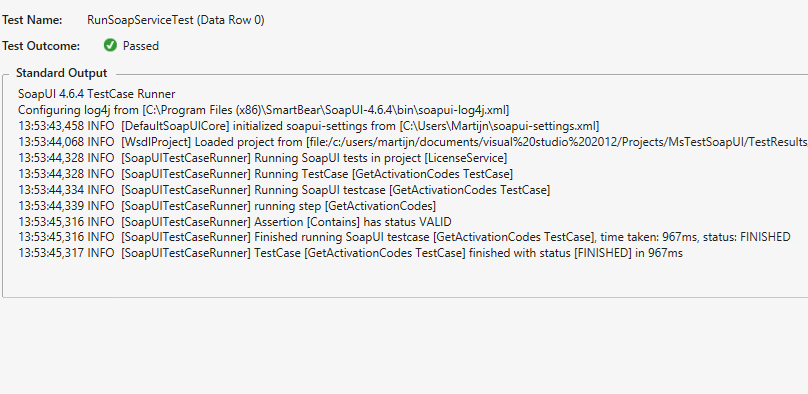
I used the deploymentitems because I don't want absolute paths etc (I need the buildserver to handle this as well). Run the test and we get SoapUI output in Visual Studio / Build. Sweet :) To run this in a CI build you only need to install SoapUI on the buildserver and all should be well.

Here's the project:

MsTestSoapUI.zip (12.08 kb)


Happy Testing!

Creating a simple logging Interceptor using NInject 3.0

8. oktober 2013 20:52 by martijn in .net, DRY, ninject

One of the really cool aspects of Depency Injection is the ability to add functionality without changing existing code. A typical example of this might be implementing INotifyPropertyChanged or logging method calls. Using NInject 3.0 Interceptors it is very easy to do this. The interceptor intercepts all calls to the resolved object and allows you to add logging or whatever code you want to run. In NInject 3.0 the methods you intercept do NOT have to be virtual as well :) So how to set it up...

Getting the right assemblies.

Using Nuget just get NInject.Extensions.Interception.Linfu. This will also setup NInject 3.0 and NInject.Extensions.Interception.


Creating the logging Interceptor

This is just a sample interceptor that logs using Console.Writeline. Normally you would call something like Log4Net or your preferred logging framework. Implementing IInterceptor means you have to implement a Intercept method. The Intercept method gets a invocation as a parameter. By invocation.Proceed() the original method gets called. The logger first logs the method being called and the arguments it is called with. After the invocation.Proceed() it logs the result of the method call. The interceptor is pretty simple and can certainly be improved by creating nicer more custom messages.

public class LoggingInterceptor : IInterceptor

    {

        public void Intercept(IInvocation invocation)

        {

            var methodName = invocation.Request.Method.Name;

            try

            {

                var parameterNames = invocation.Request.Method.GetParameters().Select(p => p.Name).ToList();

                var parameterValues = invocation.Request.Arguments;


                var message = string.Format("Method {0} called with parameters ", methodName);

                for (int index = 0; index < parameterNames.Count; index++)

                {

                    var name = parameterNames[index];

                    var value = parameterValues[index];

                    message += string.Format("<{0}>:<{1}>,", name, value);

                }


                //log method called

                LogMessage(message);


                //run the intercepted method

                invocation.Proceed();


                //log method return value

                if (invocation.Request.Method.ReturnType != typeof(void))

                {

                    LogMessage(string.Format("Method {0} returned <{1}>", methodName, invocation.ReturnValue));

                }


            }

            catch (Exception ex)

            {

                var message = string.Format("Method {0} EXCEPTION occured: {1} ", methodName, ex);

                LogMessage(message);

                throw;

            }

        }


        private static void LogMessage(string message)

        {

            Console.WriteLine(string.Format("{0:HH:mm} {1}", DateTime.Now, message));

        }

    }


Adding the logging interceptor to your NInject Configuration

In your kernel configuration you can add interceptors to your bindings like this :

kernel.Bind<IService>().To<Service>().Intercept().With<LoggingInterceptor>();

Now when getting a IService using Kernel.Get<IService> the logginginterceptor will be interception all method calls :) A working sample console application can be found here: 

SampleLogging.rar (2.86 mb)

SampleLogging.rar (2.86 mb)


Globalizing MVC razor views using cshtml per locale

30. juli 2013 21:33 by martijn in .net, globalization, MVC

There are quite a few ways to localize your MVC applications. The best is probably to reference resources (resx) from your cshtml files. For a overview see this complete guide and the post by Hanselman

This can be a bit awkward though if you need a different structure for a different country. Another option is to use a cshtml file per locale. For example use a index.nl.cshtml file for dutch users and index.cshtml for other users. How to do this is the topic of this post. Be aware that this should not be your first choice because you basically copy your HTML making changes later on harder. It can be good to know this trick sometimes... (If you use WebForms viewengine you should use this guide.)


To get this working we need to complete a few steps

  1. Create a localized view
  2. Create a viewengine that prefers localized views and uses the default view if none is found. This makes localization optional and nice to combine with other (resource based) solutions.
  3. Register the ViewEngine in global.asax

Create a localized view

How you structure your views is arbitrary. For this post I post the localized direct next to the normal view. Here I created a Index for the dutch (nl) locale:

Creating the globalized ViewEngine

We subclass the normal RazorViewEngine and only change the part that determines which file is used. We use the CurrentUICulture of the current thread to determine which culture should be used. Then we check to see if there is a view specific for this culture. If no specific view is found the regular view is used.

using System;
using System.IO;
using System.Web.Mvc;
namespace LocalizedViews
{
public sealed class RazorGlobalizationViewEngine : RazorViewEngine
{
protected override IView CreatePartialView(ControllerContext controllerContext, string partialPath)
{
partialPath = GlobalizeViewPath(controllerContext, partialPath);
return base.CreatePartialView(controllerContext, partialPath);
}
protected override IView CreateView(ControllerContext controllerContext, string viewPath, string masterPath)
{
viewPath = GlobalizeViewPath(controllerContext, viewPath);
return base.CreateView(controllerContext, viewPath, masterPath);
}
private static string GlobalizeViewPath(ControllerContext controllerContext, string viewPath)
{
var request = controllerContext.HttpContext.Request;
var lang = System.Threading.Thread.CurrentThread.CurrentUICulture.Name;
if (!string.IsNullOrEmpty(lang) && !string.Equals(lang, "en", StringComparison.InvariantCultureIgnoreCase))
{
string localizedViewPath = viewPath.Replace(".cshtml", "." + lang + ".cshtml");
if (File.Exists(request.MapPath(localizedViewPath)))
{
viewPath = localizedViewPath;
}
}
return viewPath;
}
}
}

Registering the ViewEngine in global.asax

We can register the viewengine in the global asax like this:

 protected void Application_Start()

        {

            ViewEngines.Engines.Clear();

            ViewEngines.Engines.Add(new RazorGlobalizationViewEngine());

           //the rest of it..

        }

And that's all there is too it. Happy coding!

Using bundling to generate base64 encoded images in CSS

9. juni 2013 14:59 by martijn in .net, bundling, css

Should I use base64?


In this era of optimization and mobilization having a lot of request to load your website is considered a bad thing. One of the things you can do is 'inline' your images in your CSS file using a base64 format. This way the browser can get the CSS and the images in one big request.

There are some cons to this :

  • Images are not cached separately and when you change your css the download will be bigger.
  • IE6 and IE7 don't support base64 images in CSS. You can use a fallback tag for these browsers.
  • Your development gets more complex as you have to remember to update the base64 images in your css when you modify an image.
  • Images in css are about 37% larger than in a separate file.
  • Works for images up to 37k in IE8
  • Stylesheets get really large 

Also you might consider using a spritesheet which can be cached seperately (like jQuery UI does for example) or create a separate stylesheet for your inlined-images so your cache will not be invalidated when you change something else in you stylesheet. Some more considerations and opinions at Stackoverflow....

Creating a bundle transform to inline the images

So still interested? Some of the development disadvantages can be avoided by using a bundle transform. A bundle transform is part of the System.Web.Optimization library by Microsoft. The basic idea of bundling is combining multiple css or jss files into one big file at runtime. You can configure System.Web.Optimization to only optimize when you are in release mode so that during development you have separate readably resources. This post is about creating a bundle that replaces background-image:url('/yourimage') which base64 urls during optimization.

As you can see the image is inlined (in the 28796 characters) and a fallback for IE6/IE7 is supplied as well. 

This can be done at development time easily with the web essentials extension by Mads Kristensen. The idea of this transform is to perform the operation at runtime. The main advantage is that your development is not cluttered with having to regenerate images and having optimization only on production code.

Here's the code

So let's get into the details. Sorry for the missing syntax highlighting. I have not fixed that yet.

[code:c#]

 public class CssBaseEncodeTransform : IBundleTransform

    {

        public void Process(BundleContext context, BundleResponse response)

        {

            response.Content = InlineBase64BackgroundImages(response.Content, BundleTable.MapPathMethod);

        }


        public static string InlineBase64BackgroundImages(string content, Func<string, string> mappath)

        {

            //find background-images


            var parser = new CSSParser();

            var cssDocument = parser.ParseText(content);

            foreach (RuleSet rule in cssDocument.RuleSets)

            {

                var declarations = rule.Declarations.ToList();

                foreach (var declaration in declarations)

                {

                    if (declaration.Name == "background-image")

                    {

                        rule.Declarations.Add(GetIe6Declaration(declaration));

                        EmbedUrlInBackground(declaration,mappath);

                    }

                }

            }


            return cssDocument.ToString();

        }


        private static Declaration GetIe6Declaration(Declaration declaration)

        {

            var copy = new Declaration();

            copy.Expression = new Expression()

                {

                    Terms = new List<Term>{new Term() {Value = declaration.Expression.Terms.First().Value}}

                };

            copy.Name = "*background-image";

            return copy;

        }


        private static void EmbedUrlInBackground(Declaration declaration, Func<string, string> mappath)

        {

            var imageUrl = declaration.Expression.Terms[0].Value;

            var image = Image.FromFile(Path.GetFullPath(mappath(imageUrl)));

            var data = ImageToBase64(image, ImageFormat.Jpeg);

            var url = string.Format(@"data:image/jpg;base64,{0}", data);


            declaration.Expression.Terms[0].Value = url;

        }


        public static string ImageToBase64(Image image,ImageFormat format)

        {

            using (MemoryStream ms = new MemoryStream())

            {

                // Convert Image to byte[]

                image.Save(ms, format);

                byte[] imageBytes = ms.ToArray();


                // Convert byte[] to Base64 String

                string base64String = Convert.ToBase64String(imageBytes);

                return base64String;

            }

        }

    }

[code]

  1. The code basically looks for background-image declarations in your style sheet.
  2. If found replace the url('/image') with the base64 equivalent.
  3. A *background-image declaration is added for IE6/7 support.

Usage

Just add the transform to the bundle :

The code use the simple css parser project which can be found here (and is included in the zip). The source code is also included at the bottom. Hope is this of some use or inspiration!

Base64Bundling.zip (997.47 kb)


Getting typed JSon in TypeScript using Weld

1. juni 2013 20:32 by admin in .net, DRY, jQuery, MVC, typescript, Weld
Imagine you have a MVC controller exposing a Person as following: 

public JsonResult GetPerson(int id)
{
return Json(new Person
{
First = "Barack",
Last = "Obama"
},JsonRequestBehavior.AllowGet);
}
Now I want to use this client side. I want to update my "first" span with the First property of the person I get back from the server. After messing around I came up with the following: 
$(document).ready(function() {
$.getJSON("/Person/GetPerson/", { id: 4 }, function(data) {
$("#first").text(data.First);
});
});
This took me five minutes to get right (which JQuery method? -> Google, how to pass data? -> find example, plus a typo in the first/First member). Five minutes of stupid getting right what should be trivial. Why not let the compiler help? So using Weld I change my server side method to this :
[AjaxMethod]
public JsonResult<Person> GetPerson(int id)
{
return new JsonResult<Person>(Json(new Person
{
First = "Barack",
Last = "Obama"
}, JsonRequestBehavior.AllowGet)); ;
}
Basically I wrap my JsonResult in a generic wrapper JSonResult<T> (included with Weld) so that Weld knows what type to expect. Next I add the AjaxMethod Weld attribute. Client side I use TypeScript and use the generated proxy class.  
/// <reference path="Weld/PersonController.ts" />/// <reference path="typings/jquery/jquery.d.ts" />
$(document).ready(function () {
PersonController.prototype.GetPerson(2, (person) => {
$("#first").text(person.First)
});
});
Now person is a JavaScript object or a TypeScript 'any' type. No, Person is a fully defined TypeScript interface with a First and Last member just like my C# class. Here's the generated code:
/// <reference path="../typings/jquery/jquery.d.ts" />
class PersonController
{
GetPerson(id: number, callback: (data: Person) => any)
{
var url = "/Person/GetPerson";var data = { id: id };
$.ajax({
url: url,
type : "POST",
data: data,
success: callback,
});
}
}
interface Person
{
First: string;
Last: string;
}
As always in the end there is still JavaScript code generated which you can easily debug. Weld code is simple and clean. Easy huh? And there are more benefits:
  1. If I remove or rename my action-method the TypeScript compiler will detect my breaking client side code at compile time. If you just use javascript you will (hopefully) find out at runtime.
  2. If I add or remove properties from my Person class my changes will cascade to the clientside immediately. 
  3. I get a nice interface clientside making code completion really work 
  4. No more Googling JQuery methods
  5. This is more DRY (Don't Repeat Yourself). For example if you don't like JQuery you can build a Weld template using a different method. Regenate and you are ready
Weld is fully open source and can be found at weld.codeplex.com

Generating TypeScript proxy classes for Ajax Methods using Weld

1. juni 2013 19:30 by martijn in .net, jQuery, MVC, typescript, Weld

In this post I want to talk about a little tool called Weld I wrote to make integrating client-side TypeScript and server side MVC C# easy. 

Imagine you have a server-side method that calculates some value you want to use client side. In this sample project I want to calculate the sum of two values I have in input fields.

image

image

Server-side I have this action-method in my home controller.

public int Sum(int x,int y)
{
return x + y;
}
Now to access this method client I just need to add a Weld attribute. For this I first install Weld using NuGet. 
Just “Install-Package Weld” in your NuGet package manager console. This will install Weld as well a TypeScript.Compile and JQuery typings into your project. 
TypeScript.Compile auto compiles all your typescript files post-build. This enables you to detect any problems caused by server side changes. 
The basic process :
  1. Normal compilation
  2. Weld generates TypeScript code for the classes your decorated with Weld attributes
  3. TypeScript compiles all files in your project with build actions 'TypeScriptCompile'
For this sample I add the AjaxMethod (Weld.Attributes.AjaxMethod) attribute to the ‘Sum’ action. 
Compile the project. Weld now has generated a proxy class for my home controller. I just need to include it and used it in the project. It is located in the /Scripts/Weld folder. 
I add the generated homecontroller.ts to my project. I my main TypeScript file I write the following to hook it all up:
/// <reference path="Weld/HomeController.ts" />/// <reference path="typings/jquery/jquery.d.ts" />
$(document).ready(function () {
$("#btnSum").click(function () {
HomeController.prototype.Sum($("#number1").val(), $("#number2").val(), (result) => {
$("#result").text(result);
});
});    
});
As you can see the details of the Ajax communication are handled by weld and you get a nice interface to your server side API :)
 

Creating a Yes/No toggle switch for a boolean property in ASP.MVC

11. mei 2013 13:20 by admin in .net, jQuery, JQuery UI, MVC

When editing boolean values in MVC the default option is to use a checkbox. This results in the following Create page when using the default scaffolding

image

This is fine and works OK but sometimes you want something more..’fancy’. ASP.NET MVC ships with Jquery.UI so why no use the slider of JQuery.UI to create a nice toggle switch?

In this post I will use and modify a JQuery.UI plugin that will result in the following. The plugin is based on http://taitems.github.io/UX-Lab/ToggleSwitch/ which had some errors in my opinion.

image 

There are a two parts to this:

  1. Create a HTMLHelper extension method that renders a <select> element for the boolean property with <option> elements for true and false
  2. Change the rendered <select> element to a jquery slider using a JQuery.UI plugin

Creating the HTMLHelper

public static class HtmlHelperExtensions
{
public static MvcHtmlString ToggleSwitchFor<TModel>(this HtmlHelper<TModel> htmlHelper, Expression<Func<TModel, bool>> expression)
{
return htmlHelper.DropDownListFor(expression, new[]
{
new SelectListItem { Text = "No", Value = "false" },
new SelectListItem { Text = "Yes", Value = "true" } 
}, new { @class = "toggleswitch" });
}
}

This adds a HTMLHelper method that renders a dropdown list which comes down to a single select HTML element. There are two options in the select : one for true and one for false. To use it we just do 

@Html.ToggleSwitchFor(model => model.CommentsEnabled)

And we get the following html

<select class="toggleswitch" data-val="true" data-val-required="The CommentsEnabled field is required." id="CommentsEnabled" name="CommentsEnabled"><option value="false">No</option><option value="true">Yes</option></select>

This is all what we need to get our JQuery plugin going.

Creating the JQuery plugin

The plugin uses the JQuery.UI slider to create a toggle switch. This means that any styling or theme you might have for the slider will work for the toggle as well. The plugin transforms the select element into two labels with a slider in between. When you click on a label or move the slider the select control will be updated as well and when you do form post the values get updated. The http://taitems.github.io/UX-Lab/ToggleSwitch/ had two errors when I tried it

  1. The change event was just passing the change event of the slider. This meant even if the boolean property did not change (you moved the slider a little) you would still get a change event. In this version the change event is only fired when the value really changed.
  2. The plugin did not allow chaining.
  3. The normal ‘change’ event of JQuery was no longer fired. This is fixed by not having a change event on the control itself but just fire the existing change event.

To use it you need to add the CSS and JS of the plugin to your page. You also need the default JQuery UI js and css (which is not referenced by default!). Once you have done that you can activate the plugin for a control:

$(document).ready(function () {
$("#CommentsEnabled").toggleSwitch().change(function() {
alert("Changed!!");
});
});

I attached a sample MVC application as well as the JQuery.UI.ToggleSwitch plugin.

ToggleSampleMVC4.zip (771,1 KB)
jquery.ui.toggleswitch.zip (1,73 KB)

Adding and removing build targets from NuGet powershell

1. mei 2013 15:56 by admin in .net, msbuild, nuget
In NuGet packages you can add powershell scripts to alter the .csproj file of the project in which your package is installed. Recently I had quote some trouble getting this exactly right but nailed it in the end. So here's a sample to share with google so I can find it later ;) This sample adds a target that runs after the AfterBuild target: The Get-Project and Get-MSBuildProject are from the nuget powertools by David Fowlder. (This script is part of the install.ps1 script from a open source project called Weld).

Adding a build target to a project

$project = Get-Project
$buildProject = Get-MSBuildProject
$target = $buildProject.Xml.AddTarget("WeldAfterbuild")
$target.AfterTargets = "AfterBuild"
$task = $target.AddTask("Exec")
$task.SetParameter("Command", "`".\..\packages\Weld.1.0.0\tools\Weld.console`" bin\`$(TargetFileName) `"`$(ProjectDir)\Scripts\Weld`"")
$project.Save() #persists the changes
Notice how the ` (backtick) is used to escape the " and $ characters. This result in the .csproj like this:
<Target Name="WeldAfterbuild" AfterTargets="AfterBuild">
<Exec Command="&quot;.\..\packages\Weld.1.0.0\tools\Weld.console&quot; bin\$(TargetFileName) &quot;$(ProjectDir)\Scripts\Weld&quot;" />
</Target>
This effectively calls the Weld.Console application passing it the current project .dll name and a target folder.

Removing a build target from a project

In uninstall.ps1 we can remove the same target like this:
$project = Get-Project
$buildProject = Get-MSBuildProject
$projectRoot = $buildProject.Xml;
Foreach ($target in $projectRoot.Targets)
{
If ($target.Name -eq "WeldAfterbuild")
{
$projectRoot.RemoveChild($target);
}
}
$project.Save() #persists the changes
Basically we search for target called "WeldAfterbuild" and then remove that from the project! Easy once you know how :)

Setting up LinqToXSD in Visual Studio 2012

28. maart 2013 20:29 by admin in .net, linqtoxsd, vs2012, linq

Intro


Linq To XSD is a code generation library for accessing xml in a strongly typed manner. Linq to XSD allows you to query and xml file like this:

Offcourse you need a XSD to define the structure of your xml but once you have that the API is much nicer than the general LinqToXML.

Setting it up in Visual Studio


Since it took me way too long and way too much googling to setup LinqToXSD in VS 2012 I thought I'd do 
a HOWTO setup for VS2012. So here's the step by step
  1. Download linqtoxsd from http://linqtoxsd.codeplex.com/ (I used 2.0.2.56002)
  2. Extract the zip to ($SolutionDir)\LinqToXSD
  3. Next unload the project in which you want use LinqToXSD (right click -> Unload Project) and edit the project file (right click->edit myproject.csproj)
  4. Now you have to reference the targets file in the LinqToXSD folder. At the top of the file insert the following line:

     <LinqToXsdBinDir Condition="'$(LinqToXsdBinDir)' == ''">$(SolutionDir)\LinqToXSD\</LinqToXsdBinDir>

    So it looks like this
    5. Finally at the bottom of the project file add   

        <Import Project="$(LinqToXsdBinDir)\LinqToXsd.targets" /> 

        below <Import Project="$(MSBuildToolsPath)\Microsoft.CSharp.targets" />
    6. Reload the project
    7. If all is well you can now change the build action of xsd files in your project like this:

         
    8. Once this is done code is generated which you should be able use immediately. Your xsd/xml has to obey certain restrictions. I included two sample files which should work out of the box here :
 
books.xsd (,92 KB)
books.xml (,93 KB)

Hope this is of some use and happy easter!

Type safer databinding in legacy asp.net forms projects

22. februari 2013 10:56 by admin in .net, vs2010 vs2012
I love compilers. I love ReSharper. And that's why i hate statements like this:

<%# DataBinder.Eval(Container.DataItem,"FirstName") %>
If I was to change the name of the FirstName property or would try to find all references to this property this would not work! In asp.net 4.5 there is a ItemType property on databinding controls which you can use so the dataitem gets a proper type. See http://brijbhushan.net/2012/07/01/strongly-typed-data-controls-and-modal-binding-in-asp-net-4-5-part-1/ for an explanation about this. Unfortunately not all code is asp.net 4.5 and we can not use this feature everywhere. 

In pre asp.net 4.5 projects we can use a different construct. On the container of the databinding control we expose a type-safe version on the current dataitem like this:
public Person CurrentDataItem
{
get { return (Person) Page.GetDataItem(); }
}
Now in our binding control we can use:
 <%# CurrentDataItem.FirstName %>
No strings involved :) See the attached vs2008 sample project for an example.

TypeSafeBindingExample.zip (27,75 KB)