
SSL error when installing Sitecore with ARM templates.

2. March 2018 16:40 by martijn in azure, sitecore

If you have used the Sitecore ARM templates recently to roll out a Sitecore environment your might come accross the following error (I encountered it while trying to deploy a Sitecore 8.2.3 environment):

Failed to download package.\r\nAppGallery Deploy Failed: 'System.Net.WebException: The request was aborted: Could not create SSL/TLS secure channel

It took me quite a while to figure out what was going on but after looking on my App Service instance with excellent Kudu tools I got a good hint. In the MSDeploy log there was a error about the following package not being downloaded ""setCompatibilityLevelMsDeployPackage". This package is hosted on Github and the Sitecore ARM template refers to it. However due to security measures on Github (https://githubengineering.com/crypto-removal-notice/) the download no longer works from Azure.


So how to fix? Just upload the package to your storage account and update the parameters json.

"setCompatibilityLevelMsDeployPackageUrl":{
"value": "https://<mijblob>.blob.core.windows.net/sitecore/SetCompatibilityLevel.scwdp.zip?<your SAS token>"
},
 
Easy fix when you know what's going on :)

Sitecore Habitat Azure deployment using Team Services

2. January 2018 07:39 by martijn in sitecore, vsts

All good things come in three!


What better way to spend a few hours in the holidays with 3 great things at the same time :)

  1. Habitat - the excellent  Sitecore Solution example implementation. If you are doing Sitecore you should know about Helix and Habitat.
  2. Azure - Microsofts cloud is getting better all the time.
  3. Visual Studio Team Services - free CI/CD pipelines in the cloud :)


In this post we will combine the three by deploying the Habitat solution on a Azure AppService. We will use the ARM templates provided by Sitecore to install a vanilla Sitecore environment and on top of this we will deploy Habitat. I think this is a great way to do it because your upgrades will be easier. The Sitecore part is clearly separated from the custom code. So without further ado let's dive in!

1. ARM templates and Azure

Deploying stuff to Azure can be a bit daunting as the platform and terminology changes all the time. In this example we will deploy Sitecore to a "AppService" which is basically a web-site hosting IIS environment. For the database we will use SQL Azure and for search indexes Azure Search. To deploy all of this we can use the ARM templates provided by Sitecore. ARM stands for "Azure Resource Manager" and a ARM template is a receipe to setup a bunch of resources (Databases, AppServices etc) in Azure. Sitecore provides a number of ARM templates which setup a Sitecore environment. You can get a complete environment with a separate CM,CD and reporting machine as well. The table below describes the different ARM template options.

ConfigurationDescription
XP0This is Sitecore Experience Platform running as a single WebApp instance. Use this configuration for development and testing purposes. It is best practice to use the XM1 or XP1 configuration in production environments for security and scalability reasons.
XM1This is Sitecore Experience Management configuration running two roles: Content Delivery and Content Management. Use this environment when you are not planning to use Analytics and Marketing features of Sitecore Experience Platform (that is, in CMS-only mode).
XP1This is Sitecore Experience Platform configuration running four roles: Content Delivery, Content Management, Processing, and Reporting. Use this environment when you are planning a fully-featured Sitecore Experience Platform installation.


In this post we will use the simple XP0 templates for Sitecore 8.2.4 (the latest Sitecore version for Habitat at the time of writing). You can get the templates here.

Upload Web deploy packages to blob storage

In addition to the ARM templates your also need to host a couple of webdeploy packages for Azure to install. For Habitat we need 3 packages:

  1. Sitecore 8.2.4 single instance. This installs Sitecore in a combined CM/CD single role. You can download this from Sitecore under the AppService section. Pick the packages for XP0 configuration. 

  2. Webforms for Marketers 8.2.3 module. This module is required by Habitat and can be downloaded from Sitecore.

  3. Sitecore Cloud Integration Bootload module. This module is required when you want to install additional (Wffm) modules in your ARM template. This package is part of the Sitecore Azure Toolkit 1.1 here and is located in /resources/8.2.4/Addons

Once you have these three packages. You have to upload them to Azure blob storage for which you can use the Azure Storage Explorer. Upload the packages as blob.

Use copy URL for the packages and insert this into your ARM configuration (more about that in a bit). To make the assets downloadable to need to suffix the url with a SAS query-string token which you can generate in Storage Explorer:

Create MongoDb databases 

Unfortunately the ARM templates are not all Azure and you need 4 Mongo databases for analytics. You can get these for free however at mlab.com :). Create 4 databases and create a user for each database.

 Creating a parameters.json configuration file 

Next we need to put together all the configuration in a azuredeploy.parameters.json file. In the screenshot below you can see the extra configuration for WFFM as well in the modules section.

Running the templates from Powershell

Finally we can put it all together by running a Powershell script. I am running the following PowerShell script from a folder in which the azuredeploy.parameters.json file resides and the Sitecore Azure Toolkit is in a subdirectory.


Login-AzureRmAccount;

#Name of Resource Group /should be similar to Deployment ID

$Name = "habitatazure";


#Path to Sitecore license file

$LicenseXmlPath = ".\license.xml";


#Path to the ARM template file for the environment configuration to deploy. Using public github of Sitecore version

$ArmTemplateUrl = "https://raw.githubusercontent.com/sitecore/Sitecore-Azure-Quickstart-Templates/master/Sitecore%208.2.4/xp0/azuredeploy.json";


#Path to the populated parameters.json file for the selected template.

$ArmParametersPath = ".\azuredeploy.parameters.json";

cd 

#Name of Azure Datacenter

$location = "West Europe";


#Load the Azure Toolkit module

Import-Module ".\Sitecore Azure Toolkit 1.1 rev 170804\tools\Sitecore.Cloud.Cmdlets.psm1" -Verbose


#Start provisioning using the Start-SitecoreAzureDeployment commandlet

Start-SitecoreAzureDeployment -location $location -Name $Name -ArmTemplateUrl $ArmTemplateUrl  -ArmParametersPath $ArmParametersPath -LicenseXmlPath $LicenseXmlPath -SetKeyValue @{}


Run the script and you should get a popup asking for your Azure credentials. Login to Azure and select a subscription and wait for 20+ minutes. When it's done you have a working Sitecore environment in Azure :) Verify it deployed correctly by signing in to the AppService you just created (check your Azure portal for the url)

2. Building Habitat on Visual Studio Team Services

To build Habitat on Azure we are going to use Gulp. Since Habitat already uses gulp this is a small step and doesn't require extra tooling or knowledge. All we need to do is create a gulp task that deploys deploys Habitat to a temp folder and zip that temp folder. We make sure to include the Unicorn serialization files in the zip as we need them to get the Sitecore items deployed. I modified the default Habitat gulp file with a custom task Generate-Zip. When you run the task you should see  a /temp folder in your Solution root that includes all the files to deploy. In addition to the gulp file I also created a folder with some custom Azure-only configuration in a folder named Azure in your solutions root. This folder contains a custom web.config with the Azure and Habitat specific stuff combined and a file to create a site definition for your Habitat Azure site. I would have liked to transform the vanilla Sitecore web.config on deploy but haven't found a nice way yet. The problem is the Sitecore web.config is already deployed in the appservice. So in concrete. You can find my custom Habitat fork here and import it into your VSTS project to build.

VSTS

In VSTS we create a build definition with the following tasks. Basically a build is done and the temp folder is zipped. In addition to the zip some Unicorn files are also added to the artifact folder. This enables us to run a Unicorn sync on release. You can import my build definition here: Gulp-Build.json (8.81 kb)

3. Deploying to Azure (Release from VSTS)

Finally we can deploy the results of the build to our Azure Appservice in just 2 simple tasks. You can import my definition here: Deploy To Azure.json (8.03 kb) or have a good look at the following tasks. 


The first task performs a basic deployment using the zip created by the build.


The second task initiates a Unicorn sync so the Sitecore items are deployed.


Conclusion / TODO / Credits

I hope this post is of some use to you! I think the web.config part should be improved upon and am interested in any solution. I have used the following posts to help set this up:

https://visionsincode.wordpress.com/2017/08/31/continuous-integration-and-deployment-of-sitecore-habitathelix-as-an-azure-web-app/

https://www.jameshirka.com/2016/10/sitecore-habitat-deployment/


Create a custom warning in Sitecore content editor

9. August 2017 21:11 by martijn in sitecore

Sitecore has a of functionality that is not so frequently used. Did you know you could create custom warning editor warning based on rules? We created a custom warning telling the content editor the item he/she is editing is not Dutch. This is usually a mistake of the editor and creating a custom warning attracts attention. For that old-skool feeling it is even blinking :) This post explains how to create such a thing.


Creating the rule

Adding warnings to the Content Editor can be done without any code or configuration changes. This is just a matter of adding a rule item at the correct spot in sitecore.

  1. Add a  "Content Editor Warning Rule" below sitecore/system/Settings/Rules/Content Editor Warnings/Rules in your master database
  2. Modify the rule field and make sure it looks like this:


The first part of the rule checks the language of the item. We want to show the warning if the item language is not Dutch. The second line of the rule makes sure it is only shown for items in the /sitecore/content part of the tree. This means the warning won't be shown for Template items or Sitecore system items. The final part determines what happens when the conditions are met. In this case we want to show a message. You can also add a message to the log file instead of this. In the example above the content editor warning is a bit of html including a class. Defining custom styling for this class is done in an external style sheet. How you can add this stylesheet to Sitecore in a nice way is described next.


Adding a custom style sheet to Sitecore Content Editor

Sitecore can be modified in many ways and most of the time this is done by hooking into a pipeline and adding or modifying a processor in that pipeline. So when a friend asked to modify the Sitecore content editor and include an extra stylesheet we set out to find which pipeline to modify. We found quite a few posts (http://sitecoresuperman.com/the-better-solution-injecting-resources-into-the-experience-editor https://jammykam.wordpress.com/2017/07/24/injecting-resources-into-experience-editor/) but these were both about the experience editor (formerly known as page editor). We want to modify the content editor part of sitecore. Even adding to the RenderContentEditor pipeline was not working. Opening up the content editor view source should show the following:


After a lot of poking around (and decompiling) I found the following structure in the core database:

It turns out that every item here is rendered in the <head> section of the content editor. Adding a custom style is just a matter of adding an item! Sitecore has defined two "devices" : InternetExplorer and Firefox so we add the following Stylesheet item to both devices:

Finally the content of the stylesheet (including a nice retro flash). Thanks to Bert Pauw for this nice styling :)

.annoying-warning {
font-size: 200%;
color: #cc4131;
animation: blinker 1s linear infinite;
}
@keyframes blinker {
50% {
opacity: 0;
}
}

Adding the items to the core database might be something you do not like. However using Unicorn we can add the stylesheets at a very specific location. This makes this solution upgrade proof and Helix compliant :)
Happy warning!

Setting up BDD javascript testing in Visual Studio Team Services

21. April 2017 20:54 by martijn in testing, bdd

VSTS

Lately I have been very impressed by Visual Studio Team Services. Working in this environment is really a breeze and having build agents in the cloud makes development and setting up a build or release pipeline really easy. This blogpost however will dive into using VSTS build with Javascript BDD testing. The ammount of options and frameworks surrounding this can be a bit overwhelming and so this blogpost might give some guidance on how you can set it up. 

What do you mean BDD?

By BDD testing I mean specifying your tests in a Gherking style like this


Scenario: A bottle falls from the wall
   Given 100 green bottles are standing on the wall
   When 1 green bottle accidentally falls
   Then there are 99 green bottles standing on the wall

Using a Gherkin syntax provides an exta abstraction layer over more direct style unit-testing frameworks like Mocha or Jasmine. Here a non-developer could provide extra scenario's and the scenario's are pretty readable.

What are we building?

We want to be able to run our javascript BDD tests on Visual Studio Team Services and integrate the test results in our build. We want to see the results in the test tab of our build results.

 What do you need?

NodeJS

First of all you need to install Node.js for running javascript code and downloading javascript packages. Download it here. Once you have Node.js installed you should be able to run npm (Node Package Manager) from the command line. NPM provides an easy way to install javascript modules and dependencies of these modules automatically. If you have never used npm you should read up here.

Mocha 

Now you have installed npm the next step is creating a folder that will be the base folder for our development. In this folder we will initialize npm so npm creates a config file called package.json keeping track of our required modules. So open a command prompt to create a folder and initialize npm.


mkdir bddjavascript
cd bddjavascript
npm init (press enter a few times on all the questions)

 Next we need to install Mocha. Mocha is a javascript framework that will let us write tests. To install Mocha we use npm again

npm install --save-dev mocha


As you can see we now have a "devDependency" on Mocha. This means that if run "npm install" on this folder without parameters Mocha will be installed again. Mocha itself was installed in the node_modules folder along with it's depencies.

Running our first test

Now we have Mocha installed we should verify that it works correct. Create a folder called test in the root of our project (next to packaga.json) and create a file in that folder called test.js with the following contents:

var assert = require('assert');
describe('Array', function() { 
describe('#indexOf()', function() { 
it('should return -1 when the value is not present', function() { 
assert.equal(-1, [1,2,3].indexOf(4)); 
}); 
}); 
});

To run this test we use mocha from the command line.

node_modules\.bin\mocha

And you should see the test pass.

Yadda Yadda Yadda

Next we can add the BDD layer by installing Yadda. In the console we use npm again

npm install yadda --save-dev

Now we have Yadda we need a few more files to get it all working. Yadda requires a feature file with our scenario('s), a file implementing the steps and normally an object under test. For the object under test we'll use a regular javascript array so we don't need a file for that. In our test folder we create a features folder.

mkdir features

In this folder create a file called "array.feature" containing:

Given I have an array of 2 elements

When I add an element

Then my array contains 3 elements

Next to features folder create a steps folder with a array-steps.js file containing

 var assert = require('assert');

var English = require('yadda').localisation.English;


module.exports = (function() {

  return English.library()

    .given("I have an array of $NUM elements", function(number, next) {

       array = new Array(parseInt(number));

       next();

    })

    .when("I add $NUM element", function(number, next) {

       array.push("hi");

       next();

    })

    .then("my array contains $NUM elements", function(number, next) {

       assert.equal(parseInt(number), array.length);

       next();

    });

})();

Now we only need a main entry point for running the feature file. Create a file called yadda-test.js in the root of your project

var Yadda = require('yadda');

Yadda.plugins.mocha.StepLevelPlugin.init();


new Yadda.FeatureFileSearch('./test/features').each(function(file) {


  featureFile(file, function(feature) {


    var library = require('./test/steps/array-steps');

    var yadda = Yadda.createInstance(library);


    scenarios(feature.scenarios, function(scenario) {

      steps(scenario.steps, function(step, done) {

        yadda.run(step, done);

      });

    });

  });

});

Your project structure should resemble this

Running yadda can be done from the command line using

node_modules\.bin\mocha yadda-test.js

And you should see the tests pass

Running in build proces

Finally we need to run the tests as part of our build proces.

Getting templateID of glass generated interface

26. January 2017 08:18 by martijn in

If you are using glass with the t4 template genaration you can generate partial interfaces for your Sitecore datasource templates. These interfaces look a something like this: 

I create a simple helper to get the ID like this


And here's the implemenation:

public static class GlassHelper

{

        public static Guid GetTemplateId<T>() where T : ISitecoreBase

        {

           var attribute = typeof(T).GetCustomAttributes(typeof(SitecoreTypeAttribute), true).FirstOrDefault() as SitecoreTypeAttribute;

           return !string.IsNullOrEmpty(attribute?.TemplateId) ? 

               new Guid(attribute.TemplateId) : 

              Guid.Empty;

        }

}

Deploying unicorn yml files using web deploy.

25. January 2017 15:30 by martijn in sitecore

Where's my unicorn?


There has been al lot of attentention for Sitecore Helix and Habitat lately and it has indeed been a great inspiration for project structure and general Sitecore ideas. The Sitecore Habitat example however does not provide any guidance in handling the unicorn files in a build environment. This blog post shows a way in which the yml files are included in the Feature zip web-deploy files automatically. This means you don't have to add the yml files to TFS and your project. Futhermore Habitats folder structure is maintained so the templates are in a "serialiazation" folder next to the "code" folder containing the project. 

 Habitat folder structure

 The "code" folder contains the .csproj of the website project folder and "serialization" is the physicalRootPath configured in your unicorn file for the feature.

Auto-including the yml files

So how to get the files in "serialization" folder in the zip created by web deploy? This can be done by modifying the csproj file and including a custom targets file (unicorn.targets). In the targets file the CopyAllFilesToSingleFolderForMsdeployDependsOn target is extended. In this target the yml files in serialization folder are added FilesForPackagingFromProject collection. The files are included at the App_Data/<ProjectName> folder. That way when all the features are deployed no files are overwritten since each feature has its yml in its own folder within App_data. 


Once we build a project zip with this we get the following structure in the zip. 


The target files can be imported by adding the following line to the bottom of your csproj:

<Import Project="../../../unicorn.targets" Label="Unicorn" />

Download the targets file here : unicorn.targets (1.11 kb)

Hope this is of some use to you!


Compiling cshtml from visual studio tools menu

10. May 2016 15:46 by martijn in

We all know and love the MvcBuildViews settings you can add to your project to enable compilation of views during build. But sometimes this does not give you the desired result and it slows down your build considerably. An alternative is to invoke the view compilation on demand by configuring it as a external tool.

This is actually quite easy to do and integrates nicely with VS. In the screenshot below you see how to configure an external tool for this. The only thing that is not in the screenie is the path to the aspnet_compiler.exe which is invoked. The path i have is C:\Windows\Microsoft.NET\Framework64\v4.0.30319\aspnet_compiler.exe but this obviously depends on the version of .net your are using. 


To invoke it just select your web project and click Tools -> Compile views. The cool thing is that VS opens the file with the error once you doubleclick a line.  Sweet :)


using jQuery File Ajax Upload plugin with ASP.NET

25. March 2015 21:37 by martijn in jQuery, jquery.fileuploader

Looking at the jquery fileupload plugin I noticed there wasn't a decent example of how to get it working in a asp.net webforms application. So I decided to share my little simple sample project with you. 


The project features:

  1. Selection of a file
  2. A separate upload button
  3. A progress bar


The project uses:

  1. Jquery file uploader https://blueimp.github.io/jQuery-File-Upload/
  2. Bootstrap
  3. Jquery 1.9.1
  4. Jquery UI for the widget (this seems a bit heavy but the demo breaks i
  5. A simple ashx handler for the server side

The ashx handler is very basic and you should probably expand it. I found some nice resources here but the project was not included for download. 

Download it here

UploadSample.zip (2.27 mb)

Debugging log4net

14. March 2015 19:03 by martijn in log4net

Log4net is a great tool but it can be a bit tricky to get working. Adding a debug appender that logs to the visual studio output can be of great help. You can debug log4net by attaching the log4net DebugAppender:

Add a log4net app setting in your app.config file:

<appSettings>

<!-- log4net configuration when running in debug mode. -->

<add key="log4net.Internal.Debug" value="true"/>

</appSettings>

Add a debug appender in the log4net config:

<appendername="DebugAppender" type="log4net.Appender.DebugAppender">

<immediateFlush value="true"/>

<layout type="log4net.Layout.SimpleLayout"/>

</appender>

Finally add the appender to the log4net config root:

<root>
<level value="ALL"/>
<appender-ref ref="DebugAppender"/>
</root>

Running SOAP UI tests from MsTest

13. March 2015 13:37 by martijn in .net, mstest, soapui

Recently I have been working in a project in which the tester used a tool called Soap UI. SoapUI makes it easy to create xml based test for services. Being a big fan of Continuous Integration I thought it would be cool to include SoapUI in our CI build cycle. Here's what you need to do to make it working


1. Install Soap UI

You can get a free version here. Take notice of the location in which it installs. For me this was : "C:\Program Files (x86)\SmartBear\SoapUI-4.6.4". I put this in the app.config of my test project.

2. Create a SoapUI project. 

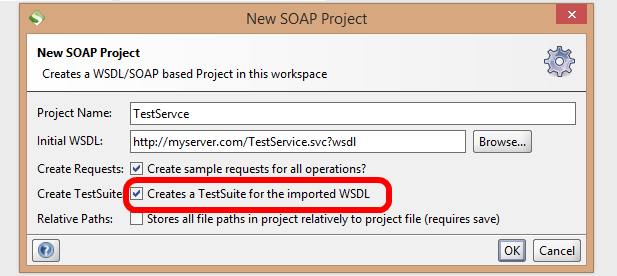
Start up your SoapUI and go File->New Project. Point it to the wsdl of the service you want to test and let it create a testsuite. 


3. Add the Soap UI project to your MsTest project

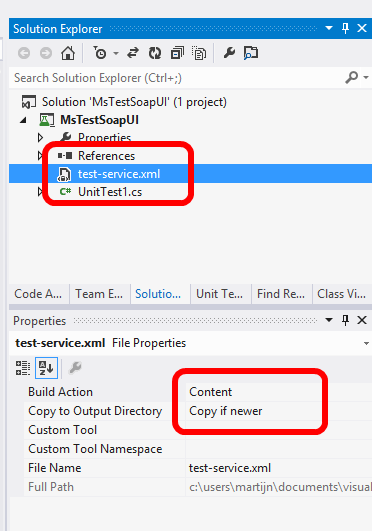
In SoapUI right click save-project as on the project node. Save your xml file into a unit test project and include the xml in your project. Set Copy to Output Directory to "Copy if newer"
  

4. Running soap UI from MsTest

This is the tricky part. How can we get SoapUI to run our test from a UnitTest?? It turns out SoapUI has something called a Testrunner.bat which makes it relatively straightforward. Basically I create a testrunner proces in a unit test and redirect the output of SoapUI to the test output. Here's what the code looks like: (a zip of the project is included below). 

        /// <summary>

       /// Runs soapUI test named testName

        /// </summary>

        private void RunSoapUItest(string soapProject, string testSuiteName, string testName)

        {

            const string fileName = "cmd.exe";

            var soapProjectFileName = Path.GetFullPath(soapProject);

            var arguments = string.Format("/C testrunner.bat -s\"{0}\" -c\"{1}\" \"{2}\" ", testSuiteName, testName, soapProjectFileName);


            //for me this is C:\Program Files (x86)\SmartBear\SoapUI-4.6.4\bin

            var soapHome = System.Configuration.ConfigurationManager.AppSettings["SoapUIHome"];

            //start a process and hook up the in/output

            var proces = new Process

            {

                StartInfo = new ProcessStartInfo

                {

                    FileName = fileName,

                    Arguments = arguments,

                    WorkingDirectory = soapHome,

                    CreateNoWindow = true,

                    ErrorDialog = false,

                    RedirectStandardError = true,

                    RedirectStandardOutput = true,

                    UseShellExecute = false

                },

                EnableRaisingEvents = true

            };

            //pipe the output to console.writeline

            proces.OutputDataReceived += (sender, args) => Console.WriteLine(args.Data);


            //store the errors in a stringbuilder

            var errorBuilder = new StringBuilder();

            proces.ErrorDataReceived += (sender, args) =>

            {

                if (args != null && args.Data != null)

                {

                    errorBuilder.AppendLine(args.Data);

                }

            };

            proces.Start();

            proces.BeginOutputReadLine();

            proces.BeginErrorReadLine();


            proces.WaitForExit();//wait for SoapUI to finish


            //fail the test if anything fails

            var errorMessage = errorBuilder.ToString();

            if (!string.IsNullOrEmpty(errorMessage))

            {

                Assert.Fail("Test with name '{0}' failed. {1} {2}", testName, Environment.NewLine, errorMessage);

            }

        }

 5. Running a test per SoapUI testCase

A typical SoapUI project includes multiple testcases. To make each testcase run as a separate test we can use something called a DataSource attribute for the test. This attribute cause the test to run for every 'Row' in the XML.

[DataSource("Microsoft.VisualStudio.TestTools.DataSource.XML", "TestData\\test-service.xml", "testCase", DataAccessMethod.Random)]

Since every testCase is a row the makes every testCase run separately. You have to make sure you get xml deployed (I used a deploymentItem for that).


        /// <summary>

        /// Test Soap Stuff

        /// </summary>

        [TestMethod]

        [DeploymentItem(@"test-service.xml", "TestData")]

        [DataSource("Microsoft.VisualStudio.TestTools.DataSource.XML", "TestData\\test-service.xml", "testCase", DataAccessMethod.Random)]

        public void RunSoapServiceTest()

        {

            var testCaseName = TestContext.DataRow["name"].ToString();

            RunSoapUItest(@"TestData\test-service.xml", "BasicHttpBinding_ILicenseService TestSuite", testCaseName);

        }

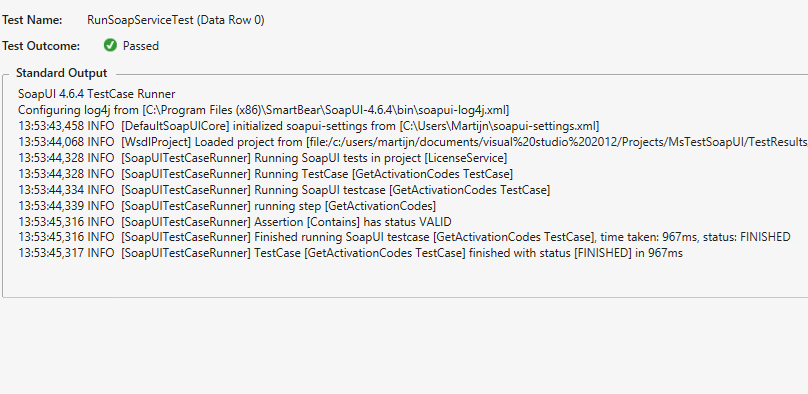
I used the deploymentitems because I don't want absolute paths etc (I need the buildserver to handle this as well). Run the test and we get SoapUI output in Visual Studio / Build. Sweet :) To run this in a CI build you only need to install SoapUI on the buildserver and all should be well.

Here's the project:

MsTestSoapUI.zip (12.08 kb)
 

Happy Testing!