All good things come in three!
What better way to spend a few hours in the holidays with 3 great things at the same time :)
- Habitat - the excellent Sitecore Solution example implementation. If you are doing Sitecore you should know about Helix and Habitat.
- Azure - Microsofts cloud is getting better all the time.
- Visual Studio Team Services - free CI/CD pipelines in the cloud :)
In this post we will combine the three by deploying the Habitat solution on a Azure AppService. We will use the ARM templates provided by Sitecore to install a vanilla Sitecore environment and on top of this we will deploy Habitat. I think this is a great way to do it because your upgrades will be easier. The Sitecore part is clearly separated from the custom code. So without further ado let's dive in!
1. ARM templates and Azure
Deploying stuff to Azure can be a bit daunting as the platform and terminology changes all the time. In this example we will deploy Sitecore to a "AppService" which is basically a web-site hosting IIS environment. For the database we will use SQL Azure and for search indexes Azure Search. To deploy all of this we can use the ARM templates provided by Sitecore. ARM stands for "Azure Resource Manager" and a ARM template is a receipe to setup a bunch of resources (Databases, AppServices etc) in Azure. Sitecore provides a number of ARM templates which setup a Sitecore environment. You can get a complete environment with a separate CM,CD and reporting machine as well. The table below describes the different ARM template options.
| Configuration | Description |
|---|
| XP0 | This is Sitecore Experience Platform running as a single WebApp instance. Use this configuration for development and testing purposes. It is best practice to use the XM1 or XP1 configuration in production environments for security and scalability reasons. |
| XM1 | This is Sitecore Experience Management configuration running two roles: Content Delivery and Content Management. Use this environment when you are not planning to use Analytics and Marketing features of Sitecore Experience Platform (that is, in CMS-only mode). |
| XP1 | This is Sitecore Experience Platform configuration running four roles: Content Delivery, Content Management, Processing, and Reporting. Use this environment when you are planning a fully-featured Sitecore Experience Platform installation. |
In this post we will use the simple XP0 templates for Sitecore 8.2.4 (the latest Sitecore version for Habitat at the time of writing). You can get the templates here.
Upload Web deploy packages to blob storage
In addition to the ARM templates your also need to host a couple of webdeploy packages for Azure to install. For Habitat we need 3 packages:
Sitecore 8.2.4 single instance. This installs Sitecore in a combined CM/CD single role. You can download this from Sitecore under the AppService section. Pick the packages for XP0 configuration.
Webforms for Marketers 8.2.3 module. This module is required by Habitat and can be downloaded from Sitecore.
Sitecore Cloud Integration Bootload module. This module is required when you want to install additional (Wffm) modules in your ARM template. This package is part of the Sitecore Azure Toolkit 1.1 here and is located in /resources/8.2.4/Addons
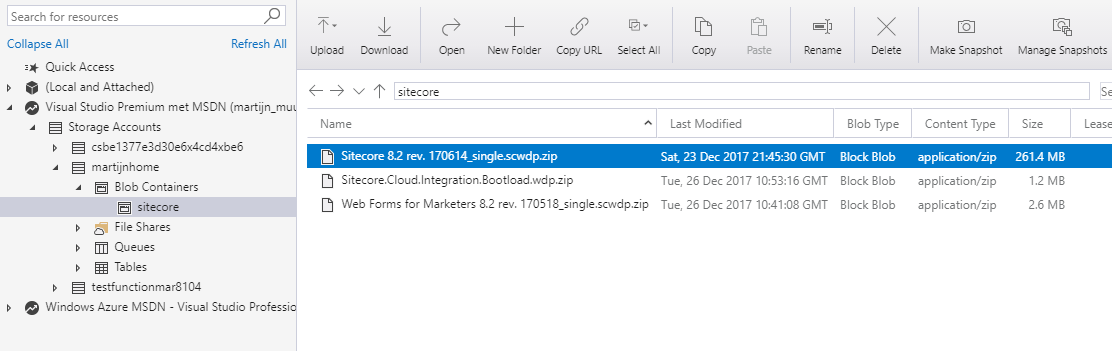
Once you have these three packages. You have to upload them to Azure blob storage for which you can use the Azure Storage Explorer. Upload the packages as blob.
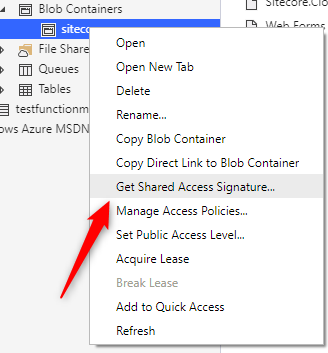
Use copy URL for the packages and insert this into your ARM configuration (more about that in a bit). To make the assets downloadable to need to suffix the url with a SAS query-string token which you can generate in Storage Explorer:
Create MongoDb databases
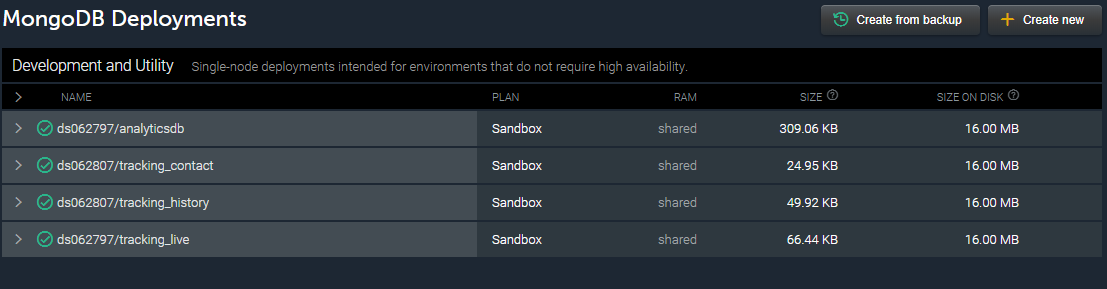
Unfortunately the ARM templates are not all Azure and you need 4 Mongo databases for analytics. You can get these for free however at mlab.com :). Create 4 databases and create a user for each database.
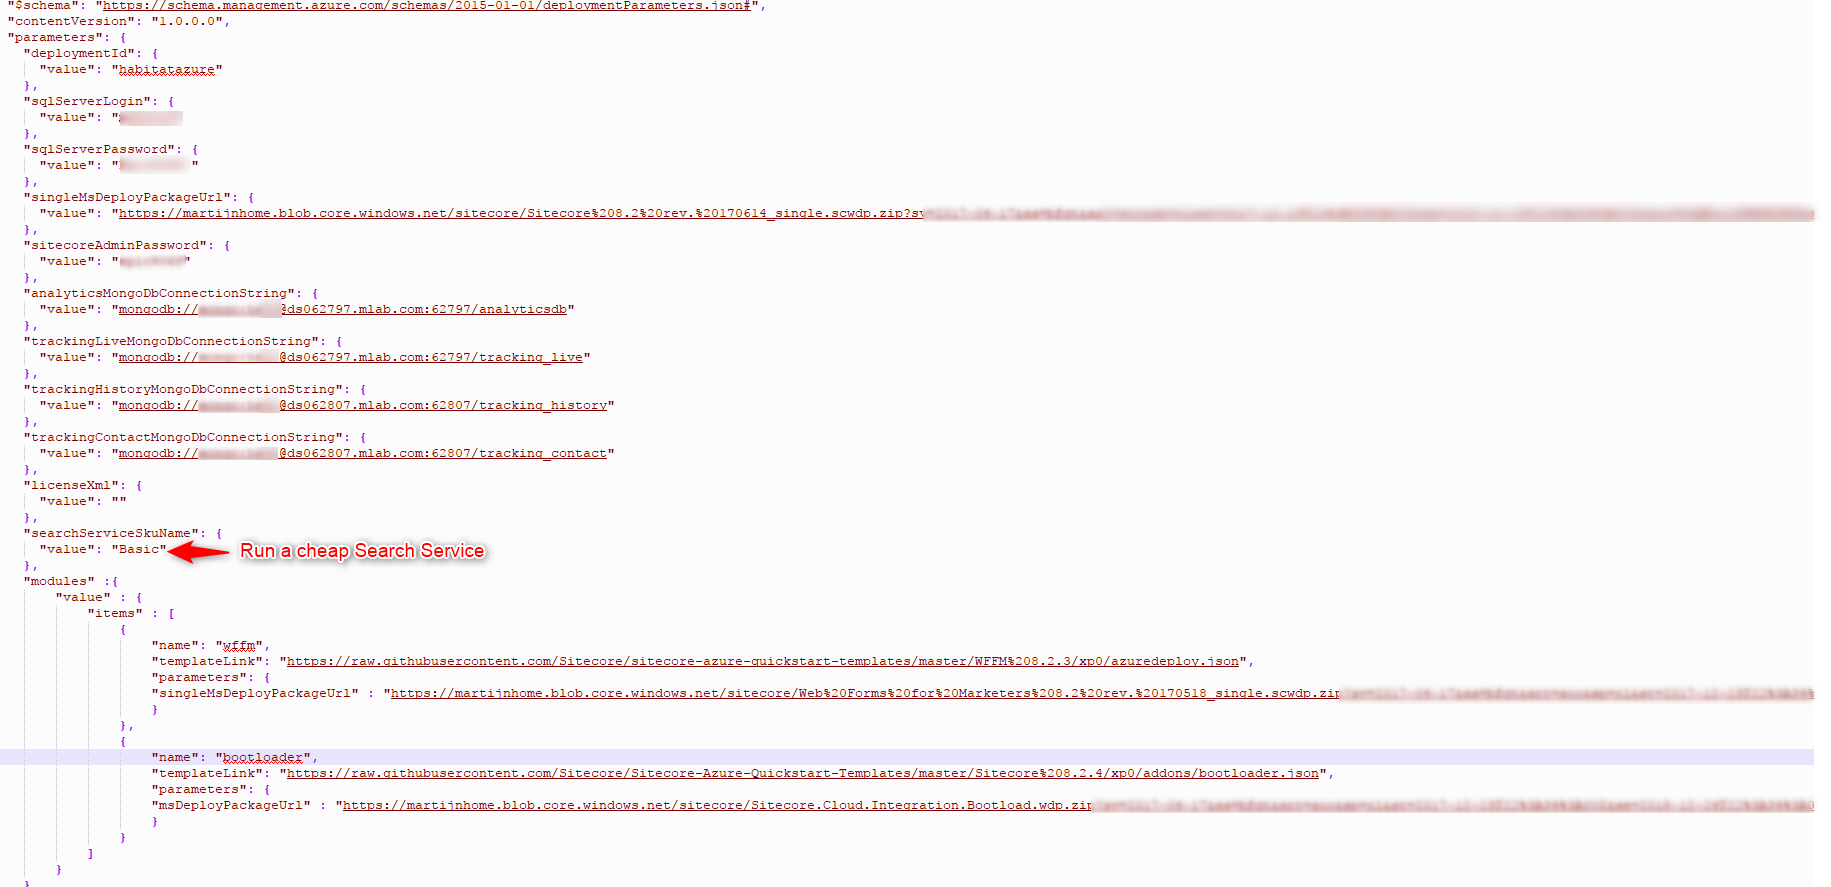
Creating a parameters.json configuration file
Next we need to put together all the configuration in a azuredeploy.parameters.json file. In the screenshot below you can see the extra configuration for WFFM as well in the modules section.
Running the templates from Powershell
Finally we can put it all together by running a Powershell script. I am running the following PowerShell script from a folder in which the azuredeploy.parameters.json file resides and the Sitecore Azure Toolkit is in a subdirectory.
Login-AzureRmAccount;
#Name of Resource Group /should be similar to Deployment ID
$Name = "habitatazure";
#Path to Sitecore license file
$LicenseXmlPath = ".\license.xml";
#Path to the ARM template file for the environment configuration to deploy. Using public github of Sitecore version
$ArmTemplateUrl = "https://raw.githubusercontent.com/sitecore/Sitecore-Azure-Quickstart-Templates/master/Sitecore%208.2.4/xp0/azuredeploy.json";
#Path to the populated parameters.json file for the selected template.
$ArmParametersPath = ".\azuredeploy.parameters.json";
cd
#Name of Azure Datacenter
$location = "West Europe";
#Load the Azure Toolkit module
Import-Module ".\Sitecore Azure Toolkit 1.1 rev 170804\tools\Sitecore.Cloud.Cmdlets.psm1" -Verbose
#Start provisioning using the Start-SitecoreAzureDeployment commandlet
Start-SitecoreAzureDeployment -location $location -Name $Name -ArmTemplateUrl $ArmTemplateUrl -ArmParametersPath $ArmParametersPath -LicenseXmlPath $LicenseXmlPath -SetKeyValue @{}
Run the script and you should get a popup asking for your Azure credentials. Login to Azure and select a subscription and wait for 20+ minutes. When it's done you have a working Sitecore environment in Azure :) Verify it deployed correctly by signing in to the AppService you just created (check your Azure portal for the url)
2. Building Habitat on Visual Studio Team Services
To build Habitat on Azure we are going to use Gulp. Since Habitat already uses gulp this is a small step and doesn't require extra tooling or knowledge. All we need to do is create a gulp task that deploys deploys Habitat to a temp folder and zip that temp folder. We make sure to include the Unicorn serialization files in the zip as we need them to get the Sitecore items deployed. I modified the default Habitat gulp file with a custom task Generate-Zip. When you run the task you should see a /temp folder in your Solution root that includes all the files to deploy. In addition to the gulp file I also created a folder with some custom Azure-only configuration in a folder named Azure in your solutions root. This folder contains a custom web.config with the Azure and Habitat specific stuff combined and a file to create a site definition for your Habitat Azure site. I would have liked to transform the vanilla Sitecore web.config on deploy but haven't found a nice way yet. The problem is the Sitecore web.config is already deployed in the appservice. So in concrete. You can find my custom Habitat fork here and import it into your VSTS project to build.
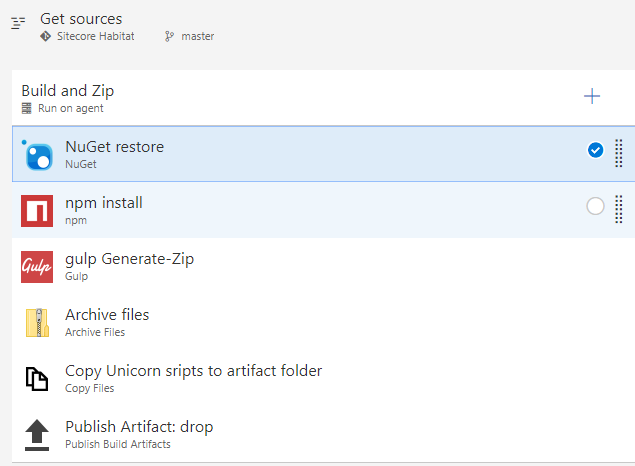
VSTS
In VSTS we create a build definition with the following tasks. Basically a build is done and the temp folder is zipped. In addition to the zip some Unicorn files are also added to the artifact folder. This enables us to run a Unicorn sync on release. You can import my build definition here: Gulp-Build.json (8.81 kb)
3. Deploying to Azure (Release from VSTS)
Finally we can deploy the results of the build to our Azure Appservice in just 2 simple tasks. You can import my definition here: Deploy To Azure.json (8.03 kb) or have a good look at the following tasks.
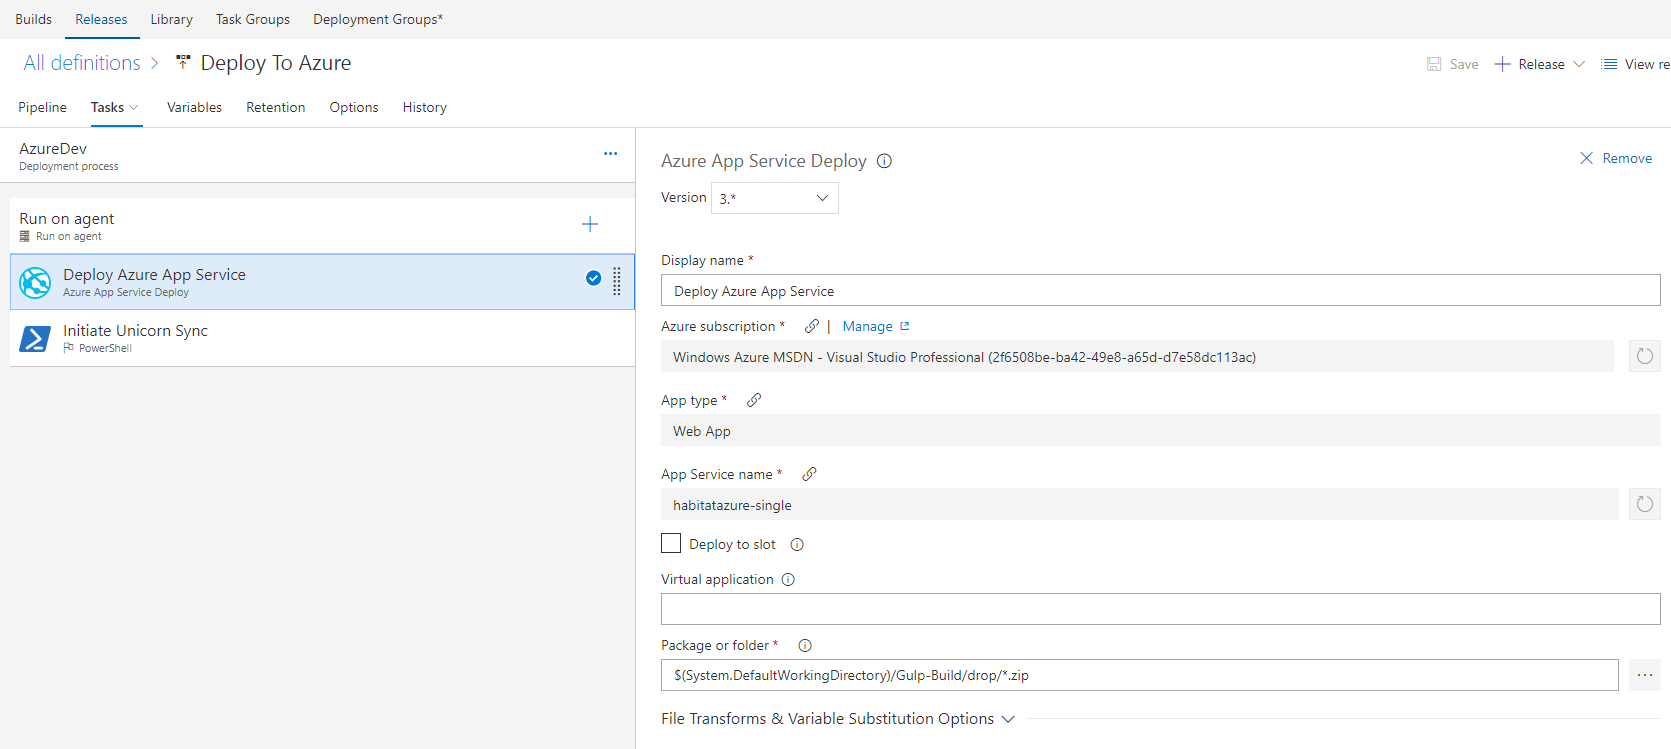
The first task performs a basic deployment using the zip created by the build.
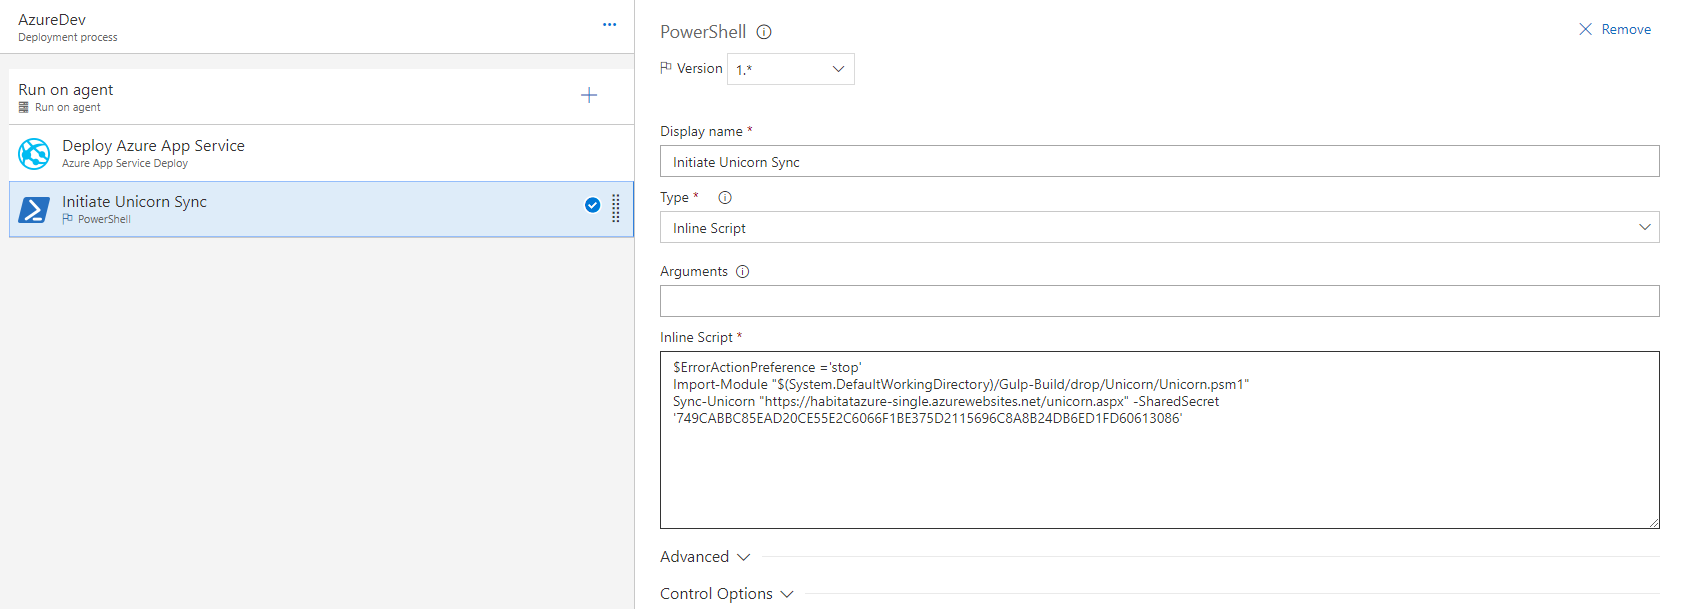
The second task initiates a Unicorn sync so the Sitecore items are deployed.
Conclusion / TODO / Credits
I hope this post is of some use to you! I think the web.config part should be improved upon and am interested in any solution. I have used the following posts to help set this up:
https://visionsincode.wordpress.com/2017/08/31/continuous-integration-and-deployment-of-sitecore-habitathelix-as-an-azure-web-app/
https://www.jameshirka.com/2016/10/sitecore-habitat-deployment/